On completion of this stage you should be familiar with the following concepts:
|
Modeling techniques: |
Importing data, Concatenating text values, Validation |
|
Useful process templates: |
Service, Load Excel Table, Concatenate |
|
Useful display templates: |
File Input Field |
In this stage we shall move on to handle the Purchaser’s view of the application.
The purchaser’s job is to review requisitions, to get quotes for prices and to issue Purchase Orders (POs) for the items specified in the requisitions.
The purchaser manages a list of suppliers to whom the relevant POs are issued.
To support this, we shall model the following:
Managing the list of approved suppliers – Including the import of a list of suppliers from an Excel spreadsheet.
Managing the list of POs. Each requisition may result in the purchaser issuing multiple POs to one or more suppliers.
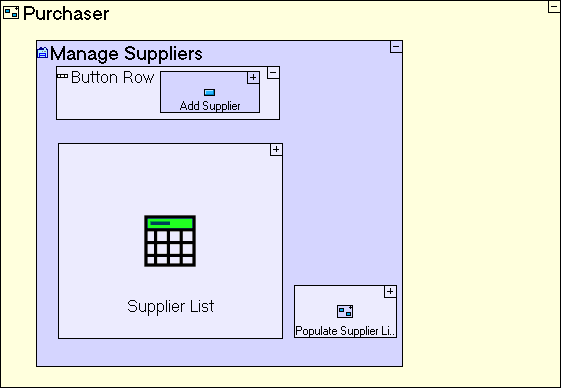
On completing the previous stage, we included in the sample project a new Purchaser perspective with a basic Manage Suppliers view, which manages a Suppliers database table and already implements the display in a table and the addition of new suppliers.
The model provided looks as follows:
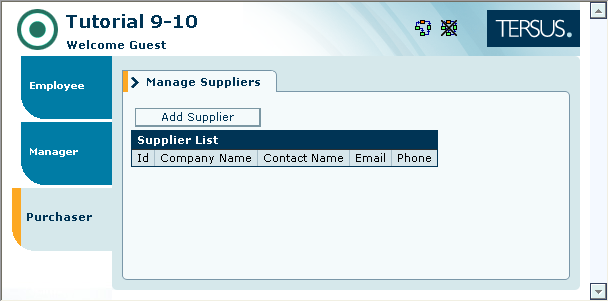
When viewed in the browser, it looks as follows:
This stage’s modeling should be performed in the Tutorial 9-10 project, you imported at the end of the previous stage.
In most organizations, some data is maintained by certain officers on their PCs, using a spreadsheet program such as Excel (or in an application that can output/export Excel files).
For the sake of this tutorial, we shall assume that the purchaser in our organization has been maintaining the list of approved suppliers in a spreadsheet. A sample spreadsheet, Suppliers.xls is provided in [tersus root]/workspace/Tutorial 9-10.
The data in the spreadsheet should be imported into the Suppliers database table which is already modeled.
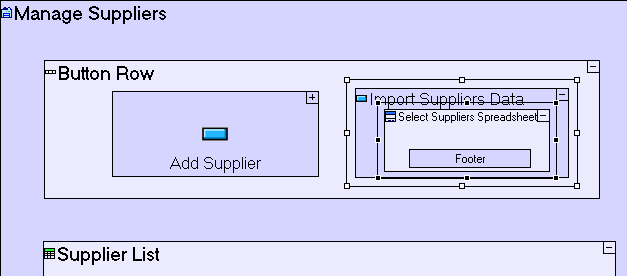
We shall add a button and popup which allow the user to select, and ultimately import, the data:
Zoom to the Manage Suppliers view.
Add Display/Button next to Add Supplier. Name it Import Suppliers Data. Zoom into it.
Add Display/Popup. Name it Select Suppliers Spreadsheet.
The model should look as follows:
Zoom into Select Suppliers Spreadsheet.
Add Display/Row. Name it File Row. Zoom into it.
Add Display/Label. Name it File:.
Add Display/File Input Field. Name it File.
Zoom to Select Suppliers Spreadsheet/Footer.
Rename the OK button to Import.
The Select Suppliers Spreadsheet popup model should look as follows:
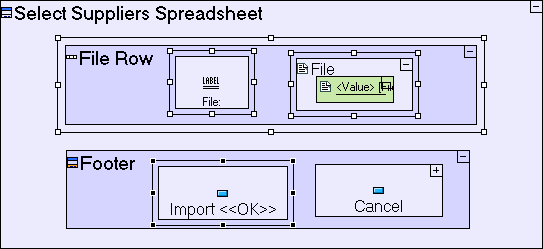
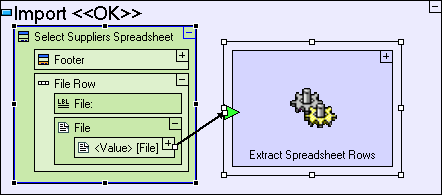
The File Input Field (File) contains a default <Value> data element (of type File) which is needed in order to manipulate and extract the contents of the file.
Save your work, and view the application in the browser.
Click on the Purchaser perspective tab.
Press the Import Suppliers Data button.
The popup we have created should look as follows:
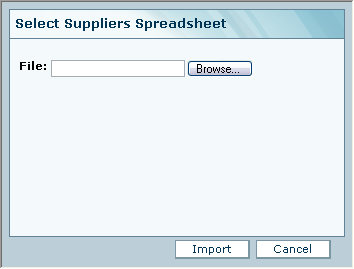
Notice that a File Input Field is actually implemented in the browser in two parts: a text edit which contains the file name which may be manually entered, and a Browse… button, which allows the user to navigate his local file system, and select the file to import.
Now that we can select a spreadsheet file to import, let’s model the actual import process.
Start by retrieving the file selected by the user in the Select Suppliers Spreadsheet popup:
Zoom to the Import button.
Add an ancestor reference of the Select Suppliers Spreadsheet popup.
Add a Basic/Service
(![]() ).
Name it Extract Spreadsheet Rows. Add a Trigger
to it.
).
Name it Extract Spreadsheet Rows. Add a Trigger
to it.
Add flow linking Select Suppliers Spreadsheet/Row/File/<Value> to the Extract Spreadsheet Rows trigger.
The Import button model should look as follows:
Note that we are using a new type
of process template, Basic/Service (![]() ),
for
Extract Spreadsheet Rows, instead of the usual
Basic/Action.
),
for
Extract Spreadsheet Rows, instead of the usual
Basic/Action.
The fundamental difference between
a Service and an Action is that the modeling inside a
Service, will always execute on the server-side, whereas
Action models will switch dynamically (and transparently)
between Client and Server as required by the different
templates used in the model.
There are however certain modeling
scenarios, such as the modeling we are about to perform, which must
explicitly be defined as executing on the server-side. For more
information, see Stage 13.
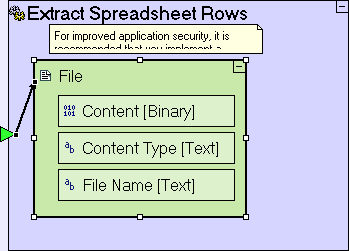
The <Value> data element of the File input field is passed to the Extract Spreadsheet Rows process, and into another File data element:
Zoom into Extract Spreadsheet Rows.
Add a Data Types/File data structure
(![]() ).
).
Add flow linking the Extract Spreadsheet Rows trigger to the File data structure.
The Extract Spreadsheet Rows service model should now look as follows:
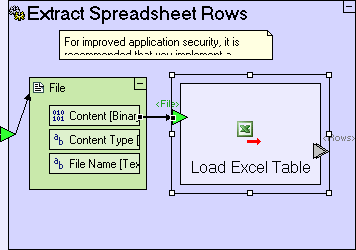
The Content element of the File data structure contains the actual Excel data:
Add a Miscellaneous
/Load
Excel
Table template (![]() ).
).
Add flow linking File/Content to Load Excel Table/<File>.
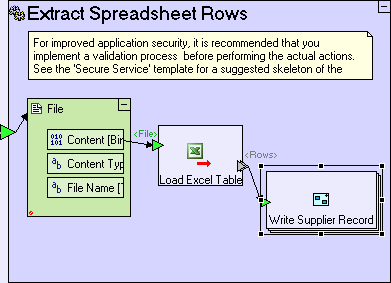
The Extract Spreadsheet Rows service model should now look as follows:
You may be thinking that the
modeling we have so far performed in the Import
button is unnecessarily complicated, and can be simplified by
directly passing Select Suppliers
Spreadsheet/Row/File/<Value>/Content
to Load Excel Table/<File>.
We
have modeled as we did, due to limitations imposed by the browser,
which does not allow access to Content
directly. The File data
structure must be passed to the server as-is, in order for Tersus to
be able to extract the binary content from it.
Let’s pause for a minute and take a look at the sample spreadsheet file, Suppliers.xls, from which we plan to import the data:
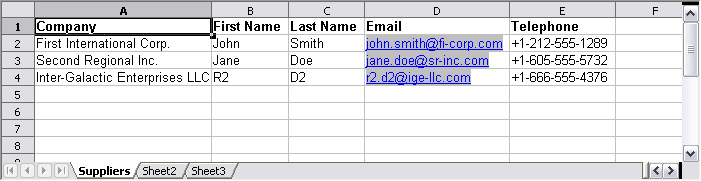
The data appears in the Suppliers sheet, and is formatted in a tabular format, where the first row defines column names (Company, First Name, Last Name, Email, and Telephone) and subsequent rows contain supplier information (one per row).
Load Excel Table will search for data in the first sheet by default. If the required sheet is not the first one in the file, you may specify the sheet using the optional <Sheet Name> trigger (available through right-click -> Add Element).
The Load Excel Table process still needs a definition of the way the relevant data in the sheet is structured. This definition is provided in a similar fashion to the Find template (discussed in a previous stage) – by deducing the data structure from the target of its exit, <Rows>, as we will see in a few minutes.
Once rows are extracted, the data should be copied into the Supplier database record which is used to store suppliers in the database:
Zoom to Extract Spreadsheet Rows.
Add a Basic/Action. Name it Write Supplier Record. Add a Trigger to it.
Add a flow linking Load Excel Table/<Rows> to the Write Supplier Record trigger.
As there are usually multiple rows extracted from the spreadsheet (which is the reason the <Rows> exit is repetitive), the Write Supplier Record process should be marked as repetitive – meaning that it is executed once for each row which is extracted by Load Excel Table:
Right-Click on the Write Supplier Record process, and check the repetitive option.
The Extract Spreadsheet Rows process should look similar to the following:
The input to the Write Supplier Record trigger is a single row from the spreadsheet, and so it is time to define its type:
Zoom into Write Supplier Record.
Add a Data Types/Data Structure
(![]() ).
Name it Supplier Spreadsheet Row.
).
Name it Supplier Spreadsheet Row.
Add flow linking the Write Supplier Record trigger to Supplier Spreadsheet Row.
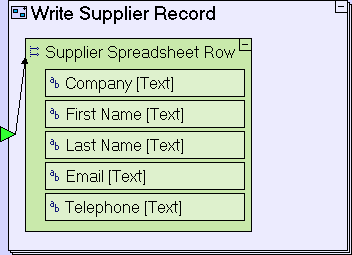
The Write Supplier Record action process should look similar to the following:

Recall that in a previous stage we mentioned that a Data Structure and a Database Record are practically identical, apart from the fact that the latter is automatically mapped to a table in the database.
The fields in this data structure should exactly match the columns names (the first row) of the spreadsheet (see the screenshot above):
Zoom into Supplier Spreadsheet Row.
Add a Data Types/Text. Name it Company.
Add a Data Types/Text. Name it First Name.
Add a Data Types/Text. Name it Last Name.
Add a Data Types/Text. Name it Email.
Add a Data Types/Text. Name it Telephone.
The Write Supplier Record process should now look as follows:
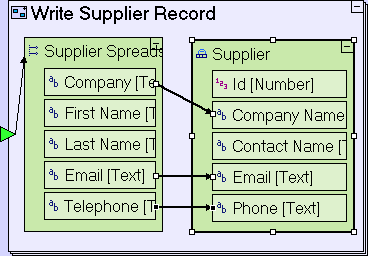
The data in each Supplier Spreadsheet Row should be copied to a corresponding Supplier record:
Zoom to Write Supplier Record.
Reuse the Supplier data structure from the repository/outline (find it in Manage Suppliers view/Supplier List table).
Create flow linking the following:
Supplier Spreadsheet Row/Company to Supplier/Company Name
Supplier Spreadsheet Row/Email to Supplier/Email
Supplier Spreadsheet Row/Telephone to Supplier/Phone
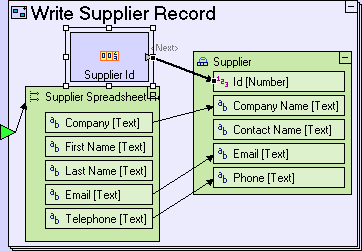
The Write Supplier Record process should now look as follows:
Two additional fields should be populated in Supplier:
Id – A unique identifier for each supplier.
Contact Name – The Supplier record has a single field for storing the name of the contact person as opposed to the spreadsheet where there are two fields, First Name and Last Name. Therefore Contact Name should store the two fields joined together.
Id will be populated using the Sequence Number action. The same one used in Add Supplier button/Enter New Supplier popup/Submit button:
Reuse Supplier Id by dragging it from the repository/outline.
Add flow linking Supplier Id/<Next> to Supplier/Id.
The Write Supplier Record process should now look as follows:
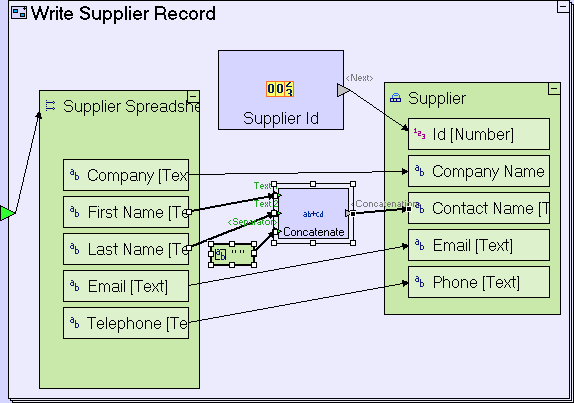
To join First Name and Last Name into a single text value (remember that there should also be a space separating them), do the following:
Add a Text/Concatenate template (![]() ).
).
Create a flow linking Supplier Spreadsheet Row/First Name to Concatenate/Text 1.
Create a flow linking Supplier Spreadsheet Row/Last Name to Concatenate/Text 2.
Add a Constants/Text. Press [Space] once to create the “ “ constant, and create a flow linking “ “ to Concatenate/<Separator>.
Create a flow linking Concatenate/<Concatenation> to Supplier/Contact Name.
The Write Supplier Record process should now look as follows:
To complete the import process, we need to take care of the following:
Insert Supplier records to the database.
Close the Select Suppliers Spreadsheet popup
Refresh the Supplier List table in the Manage Suppliers view.
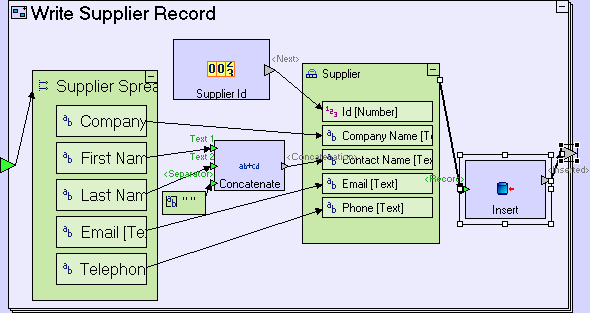
To add Supplier records to the database:
Zoom to Write Supplier Record.
Add Database/Insert.
Create a flow linking Supplier to Insert/<Record>.
Add an Exit to Write Supplier Record.
Create flow linking the Insert/<Inserted> exit to the Write Supplier Record exit.
The Write Supplier Record process should now look as follows:
To wrap up the import process, closing the popup and refreshing the Supplier List, additional flow must be defined:
Zoom out to Extract Spreadsheet Rows service. Add an exit to the process.
Create a flow linking the Write Supplier Record exit to the Extract Spreadsheet Rows exit.
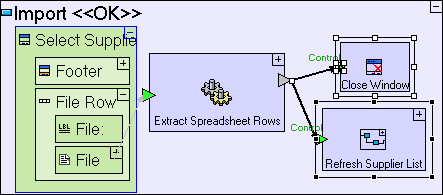
Zoom out to Import button.
Add a Display Actions/Close Window template. Add a Control trigger (through right-click->Add Element or by simply adding a trigger).
Link the Extract Spreadsheet Rows exit to the trigger of Close Window.
Reuse the Refresh Supplier List process (used in Add Supplier button/Enter New Supplier popup/Submit button) by dragging it from the repository/outline.
Link the Extract Spreadsheet Rows exit to the trigger of Refresh Supplier List.
The Import button model should now look as follows:
If you now save your work, you should automatically receive the following warning:
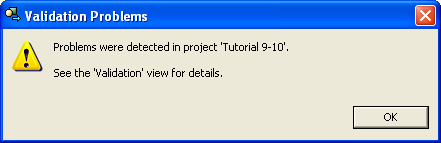
Clicking OK, the focus will switch to the Validation view:
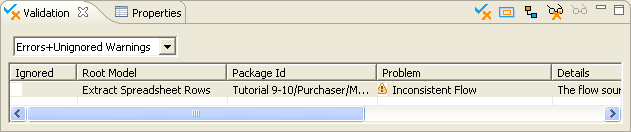
The Validation
view is the interface to a built-in utility, which checks your models
and notifies you of potential problems).
By default validation is run on every save, but you can run it
independently, without saving, by switching to the Validation view and clicking the Validate ( ) toolbar button.
Click on the cell containing Extract Spreadsheet Rows (in fact you can click on any of the cells except the one in the Ignored column).
The model editor will zoom to the Extract Spreadsheet Rows with the last flow arrow highlighted in red to pinpoint the validation warning, as in the following screenshot:

The validation warning is caused by the fact that the flow arrow starts at a repetitive element (the exit slot of the repetitive Write Supplier Record process) but terminates at a non-repetitive element (the exit slot of the Extract Spreadsheet Rows process), as descibed in the Details column of the Validation view.
This
issue is designated a warning rather than an error, because in some
modelling scenarios this is actually the intended modelling. Indeed Extract Spreadsheet Rows
is one such case, therefore it should simply be ignored.
In order to avoid being reminded of this non-issue in future validations, you can request to hide it in the future, as follows:
Click (again) on the row in the Validation view, to make sure it is selected.
Click the Ignore
selected warnings ( ) toolbar button.
To wrap up this stage, switch to the browser and review the results:
Click on the Purchaser perspective tab.
Press the Import Suppliers Data button.
In the Select Suppliers Spreadsheet popup press the Browse… button.
Navigate to [tersus root]/workspace/Tutorial 9-10 and select Suppliers.xls.
Press the Import button.
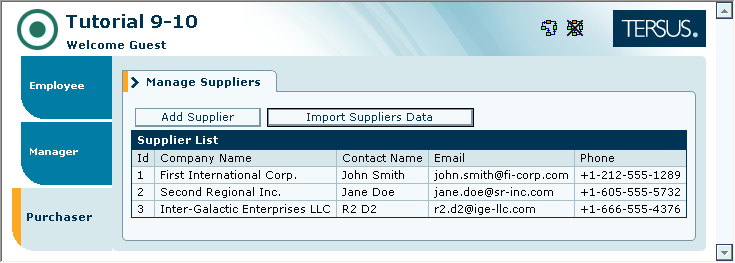
The resulting Supplier List should look similar to the following:
Import the sample project Tutorial 10-11 and use it as the basis for the next stage of the tutorial.
For a reminder on how to import a sample project, see the Importing a Sample Project section at the end of Stage 2.
This sample project contains all the functionality modeled thus far.
You may now proceed to Stage 11, in which we shall model a table display using a different technique which provides better control of its content.
Click here to open the live project in a separate window.